We made something so scrumptious today that it is my new favorite. I think Shannon would even agree. :) If you LOVE bread or cheese, read on.
I am a messer, which does not mean that I am messy, it just means that I mess with stuff. I can never just DO WHAT THE RECIPE SAYS! I have to find my own way. Here is a link to the ORIGINAL RECIPE. Check it out before you read on.
My version is much simpler and may make you more willing to try it, but the original is still sinfully AWESOME and should be attempted at least once. I will do the original recipe some day. Part of my problem is that I am impatient. I can not wait until everything is perfect before I do something so I just DO IT. Sometimes this means I blunder along and get stuff wrong or the thing turns out like I did not intend. Sometimes it works out okay and this time it did. :)
So, What I did was first, use a muti-grain bread loaf. Try to help the healthy level there. I inserted the provolone but I folded it in half and stuck the whole slice in there, not just half. I sauteed some mushrooms and filled the bread with them, pressing them down into the crevices. Then I sprinkled the green onions on top of the mushrooms.
Now, melted butter would be SOO yummy and make this gooier than EVER, but it is not healthy for you in large quantities. Since I forgot this part of the recipe and did not add it, this makes my recipe even healthier. :) I just wrapped it in foil, put in the oven and heated to melt the cheese. When it came out it was AWESOME (in case you forgot from earlier). However, I though to myself, hmm, could it be any more awesome? The answer was yes; it needed some kind of seasoning so I added a couple of seaoning mixes from the cabinet (on different parts) to try them out. You should definitely at least use a little seasoned salt but try Tony Chacere's if you like cajun spice or an italian spice mix if you want to go that direction. Even just a little garlic salt would be great.
The best thing about this recipe is that you can use the basic idea and go crazy with alternative fillings!!! I never thought about just filling the loaf with food and letting people take it apart themselves!! What a lazy way to serve sandwiches!!! You could do ham and swiss. You could do pepperoni and mozz. You could do corned beef and cabbage with some kind of cheese. You could even do basic ground beef (or turkey) and sharp chedder. I mean, the possibilities are endless!
I wish you all well, hope you enjoy your cheesy pull apart bread and I suggest you arm ourself with a blunt weapon in case people start coming out of the woodwork trying to get your bread. They will. }:}
Do you have any good filling ideas? Let me know what your ideas are and if you try this. I want to know how good it is!!!
Friday, February 24, 2012
Monday, February 13, 2012
A new Skirt Make-over
You can find the tutorial for the ruffled skirt portion here. Click Here
I made a pair of shorts into a ruffled skirt. How fun for the girls. Little Sister LOVES it. It is still big for her and she has to wear a belt but that is not stopping her. I used a pair of jean shorts from a company called Rubee Jeans. I've never heard of them before but these shorts were SOO cute. They had distressed patches and paint splotches and I just HAD to buy them (on clearance, of course, because I never pay full price for ANYTHING).
Here is a picture of them, I forgot to take the before picture so you will have to imagine them without the ruffles. I also cut out the seams that made them into shorts because my girls do not need the shorts under the skirt but if your girls are very active and need extra coverage, you can keep them intact as shorts.


So, now you are imagining how CUTE these shorts were before and wondering why not leave a good thing alone. Well, the decor was cute but the style was not. We don't wear skinny jeans or fitted shorts so these had to be altered. WEEE! I have not done any ruffles since I was in Home Ec in Highschool because it was a LOT of work. I have been wanting to make ruffled something for my girls but I was seriously not sure that I wanted to work so hard. After this alteration, I remember why I was leary of ruffles and I realize that making them look nice is harder than just making the ruffle.
Always default to MORE fabric for your ruffles rather than less. I had a specific width of fabric to work with and that is what I used but now that I am finished, I would double the fabric if I did it again. It is too flat and needs more POOF!
Here are the working process pictures. The link to the tutorial is at the beginningof this post. I did not follow her plans exactly because I was not re-purposing a T-shirt but I follwed her basic directions for making ruffles. I like her t-shirt dress MUCH better. :} I will have to follow her diretions exactly and make another, better project. Here in GA we do not need long-sleeve t-shirts for much of the year so I will likely just use a short sleeve t-shirt.


 Here is the finished product. As you can see, the ruffles are not ruffly enough. Also, they are not straight at all because I did not measure. The simplest way to keep the ruffles straight is to measure and pin. I hate pinning but I also know better.
Enjoy!
I made a pair of shorts into a ruffled skirt. How fun for the girls. Little Sister LOVES it. It is still big for her and she has to wear a belt but that is not stopping her. I used a pair of jean shorts from a company called Rubee Jeans. I've never heard of them before but these shorts were SOO cute. They had distressed patches and paint splotches and I just HAD to buy them (on clearance, of course, because I never pay full price for ANYTHING).
Here is a picture of them, I forgot to take the before picture so you will have to imagine them without the ruffles. I also cut out the seams that made them into shorts because my girls do not need the shorts under the skirt but if your girls are very active and need extra coverage, you can keep them intact as shorts.


So, now you are imagining how CUTE these shorts were before and wondering why not leave a good thing alone. Well, the decor was cute but the style was not. We don't wear skinny jeans or fitted shorts so these had to be altered. WEEE! I have not done any ruffles since I was in Home Ec in Highschool because it was a LOT of work. I have been wanting to make ruffled something for my girls but I was seriously not sure that I wanted to work so hard. After this alteration, I remember why I was leary of ruffles and I realize that making them look nice is harder than just making the ruffle.
Always default to MORE fabric for your ruffles rather than less. I had a specific width of fabric to work with and that is what I used but now that I am finished, I would double the fabric if I did it again. It is too flat and needs more POOF!
Here are the working process pictures. The link to the tutorial is at the beginningof this post. I did not follow her plans exactly because I was not re-purposing a T-shirt but I follwed her basic directions for making ruffles. I like her t-shirt dress MUCH better. :} I will have to follow her diretions exactly and make another, better project. Here in GA we do not need long-sleeve t-shirts for much of the year so I will likely just use a short sleeve t-shirt.


 Here is the finished product. As you can see, the ruffles are not ruffly enough. Also, they are not straight at all because I did not measure. The simplest way to keep the ruffles straight is to measure and pin. I hate pinning but I also know better.
 Enjoy!
Thursday, November 17, 2011
Christmas Decor
Starting NOW!
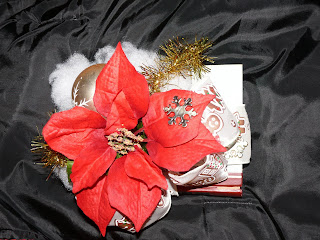
This idea is designed for Christmas but could easily be for any themed holiday. I had this project all ready to go because of a class I taught so I wanted to share while you had time to plan ahead.:) I just got out all my leftover Christmas goodies from years ago and repurposed them into a new Christmas Decor item.

Christmas Centerpiece Tutorial
You will need:
A book from Goodwill or your granny's bookcase
(I used Reader's Digest Condensed books because they are pretty, they are free at my Salvation Army Store, and I've read all the ones I have)
Hot Glue Gun and Hot Glue Sticks
6' of Ribbon (a little more if you want to make a bigger bow but 6' is enough)
Christmas pretties (non-breakable ornaments make a GREAT addition and you can get them from Christmas Tree Shops CHEAP)
Holly or evergreen from the bushes outside (or pieces of greenery garland)

You can add ANYTHING you can find that is cheap or free and when you are done it still looks awesome. I am going to do some plain nature ones next. :)
1. Wrap Ribbon around your book to measure and cut the rest off for your bow.
2. Re-wrap ribbon and hot glue ends to each other, keeping glue off book.
3. Wrap wire stem of large poinsettia or Christmas present cluster around the crossed center.
4. Make a Bow from other piece of ribbon, attach to center decor on one side.
5. Insert "Snow" (fiber fill) under other side of center decor.
6. Make an indention in the fiberfill to make a nest for ornament.
7. Glue fiberfill down and glue ornament in the nest.
8. Add finishing touches, like garland, tinsel, glitter spray, holly branches or evergreen sprigs, etc.
9. Carefully turn project side to side and upside down to see what needs more hot glue and add. Make sure everything is attached to everything where you can not see it.
10. Fluff up ribbon Bow and give away or place on table!
This was a fun project and with the exception of the hot glue you can do this with any age. The kids come up with some awesome creations. :)
Wednesday, November 16, 2011
Get a copy of a GREAT frugal book
http://www.amazon.com/Money-Saving-Moms-Budget-Streamline/dp/1451646208/ref=zg_bs_4736_2
This is the Money-Saving Mom's Budget. It will help you live more frugally. Money-saving Mom is an AWESOME blog that will help you find great deals on soooo many things, fun freebies, great recipes and SAVE MONEY too!
Sorry that this post is not linked, just highlight the link and copy to your browser. Blogspot will NOT post linked links tonight. :(
http:/moneysavingmom.com
Wednesday, October 5, 2011

Friday, September 2, 2011
Accepted on E-zine Articles
I submitted 2 articles to www.ezinearticles.com and they were accepted! How exciting. I hope this will bring something interesting my way. God is moving and I am excited to see where this will lead.

Wednesday, August 17, 2011
LEGIT: Earn money from home
Augusta friends, if you are looking for a way to earn some money for your family while staying at home WITH that family, here is an opportunity for you! It is not a scam. It is local so you can see the teacher in person and you can ask all your questions.
You use the gifts and talents you already have to make an ongoing income. This is not multi-level marketing or a pyramid scheme. There is nothing to sign up for. Just come to the class and learn the facts. If you like the idea, take what you have learned and use it. Copy the link below into your browser address bar to sign up for the class.
http://teachonline-Carol.eventbrite.com
Jocelyn periodically teaches other classes that will help you to find potential options for you and your family to make money from your skills and knowledge. I highly recommend trying a class to see what you think.
Subscribe to:
Posts (Atom)