Thursday, January 2, 2014

Birthday Party Day!

June 14th was my middle child's 12th birthday party.  She wanted a beach theme since we are having a pool party and I was up for that.  I decorated the ice cream cake and I wanted to share it with you. 

For this project, the best deal you can find is Dairy Queen large round ice cream cake for $21.95 plus tax.  Just ask for a blank cake.  They come that way from the factory to your local store in a plastic bag.  They will have it in the back deep freeze and be happy to hand it to you and collect their $22.

After you get the cake home it goes in the freezer until you are ready to decorate.  Get the blank cake out  and cut off plastic bag.  Do not remove the paper sleeve around the edges until you are ready to apply the kit-kat bars. 

I used blue food spray paint to paint the blue on the top of the cake.  The sleeve keeps your spray from overspraying the cake.  After I sprayed the blue onto the cake, I poured the Nilla wafers crumbs I made around one side of the cake to make a beach.  The sleeve will keep the crumbs from falling all over the side and serving tray.  I also added blue writing gel to the blue area to give the ocean some wave texture.  I just moved up and down in a kind of zigzag pattern while I squeezed the tube firmly.  I made sure that the "water" went up onto the edges of the sand.

Next step is to decorate the beach scene.  You can make an umbrella from a Q-tip and a cupcake liner.   You will need to trim about 1/2 inch (or a little more) from the ruffled edge of the liner and then fold it in half, flat.  Find the center of the liner and hold it there while you open the edges into 3D.   Just trim one end off the Q-tip and stick the cupcake liner to the other end.  You will want the cotton there to glue onto as it is larger and longer than a toothpick.


The umbrella went on over the bears laying out on the beach.  I made beach towels out of fruit roll-ups and I laid bears on them.  Then I used gummy Lifesavers as floatation devices and teddy grams in the rings.  I also put goldfish crackers in the water.  There are SOOO many cute ideas on Pinterest using fruit and candy items to decorate these cakes, you should DEFINITELY go check them out.


See picture below for the concept, mine was a little different. I will post my picture as soon as I can find it.  :(
This is not my photo.  If it is yours and you want me to remove it, please just let me know.

The final task is the kit-kat edge.  I like this because it gives a nice finish and you don't need to feel like you have to do any other decorating of the cake.  See above that they kept the bars together, I did not.  I think theirs looks more like a barrel and a privacy fence which is cute too.   First tip, use a sharp knife and cut between the bars, this prevents damaging the chocolate coating.   I held my first kit-kat stick up to the cake and decided how tall I wanted them to be.  Once I decide on the height, I then cut all the rest of the bars the same.  You save this until last because the cake will start to soften  and you can stick the kit-kats to the ice cream.   I put them all the way around (it took two 6-packs to do the entire outside of the cake.  Tie any ribbon around the kit-kats and pop it back into the freezer quick to solidify.

Being able to do this on an ice cream cake made my daughter's pool party in June extra special.  I was so glad it turned out cute.  It has taken WAY too long to get this posted.  Too much nursing school and not enough time for other stuff.


Wednesday, March 6, 2013

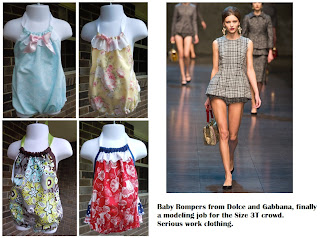
Dolce and Gabanna for Babies?!?!

Here is a disturbing new design from Dolce and Gabbana's new Fall READY TO WEAR line.  This means that they think this fashion will actually be worn in it's current design.  It is not some run-way only design.  WHAT?!?!?!  I once accidently wore my baby doll nightie bottoms to school under my clothes and I was MORTIFIED by the thought that someone might find out.  This takes those nightmares of showing up at school in your pajamas to a whole other level!!!

Enjoy!


I just want to say that I LOVE the top, absolutely FABULOUS!  but the "bottom" leaves a LOT to be desired, literally.

Friday, February 15, 2013

Decorate your Flowers


Daughter #1 is a creative soul.  She came up with ANOTHER great idea that will save you money, perk up your tired table, showcase your flowers, dress up your vases, recycle, and generally make you feel better.  How's that for a spectacular idea?!?!


See these flowers, they are so hum drum and lacking, same old tulips, same old vase and throw away paper packaging. Does this look like the last bunch of flowers you received?


Along with your pretty flowers, you probably got some very pretty tissue paper/plastic paper that they were delivered in, like this.


The great idea Daughter #1 had was to use the paper and ribbon from the flowers to dress up the vase.    A plain vase is sweet and pretty, but some flowers are not gorgeous in the vase and some vases are HO-HUM and sometimes you are just sick of the vase you have.  This project delivers on solving any of these problems and all the things mentioned above.  :)


1.  Wrap paper around vase loosely and see how tall it is and how much you need to fold up.  I found I needed to fold approximately 1/3rd of the paper.

2.  Fold the excess to the inside at the bottom of the vase (not under the vase).  This will allow you to customize the height of the paper decor at the top of the vase and adjust for the height of the flowers.  If you fold the excess paper inside, it will look fuller and you can use it as a whole piece for something later, instead of cutting it up.


3.  Once you have the paper at the height you want it at the top of the vase, tie a ribbon around the vase at the narrow part to hold the paper on the vase and then adjust the paper so that the bottom of the vase is covered. (unlike when we forgot the check and had to take the picture 3 times to finally get it right).


4.  You can also artfully fold the paper to give it more character after you get the hang of this basic idea.  Folding back the top corners where they overlap to make an opening like a shirt collar is very cute.  You could even make a "tie" for this design to make a masculine bouquet cover.

 5.  A nice balloon tied on the bouquet in the back steps up the bling another notch.  See? V  My flowers are SOOO much prettier now, than they were sitting on the table in the clear vase.


I hope you enjoy this and try it next time you have a nice bouquet of flowers that can use some "dressing up".  :)

P.S.  Husbands, you will get EXTRA brownie points if you use this technique to spruce up those lovely grocery store flowers you are going to bring home for the wife!  (you are bringing her flowers, right?!?)

Tuesday, November 13, 2012

I want a Kindle Paperwhite!!!  Money Saving Mom is giving one away!

She just published a wonderful book about keeping the holidays simple this year which of course also keeps down the costs.  You are a winner, if you buy the book, even if you do not win the paperwhite.

ME~

Flouncy T-shirt scarf

I found some tutorials online for the flouncy T-shirt scarf and I HAD to try it. Here is a link to my favorite tutorials and a picture of Daughter #1 wearing the one I made.   What I love about it is if I have a Tshirt that ends up with a stain on it in an obvious place that makes it unwearable, I can STILL use it for this craft.  Since you are cutting out circles, you just work around it.  It does not get any simpler.  Please check out the following.

The first tutorial I found.

GREAT how-to pics

The scarf is just the right size for me (plus size model) but not so great on a littler person.  If this was for her I would adjust to make the scarf shorter.  Cut wider spirals if you want it shorter and narrower spirals if you want it longer.

One thing I did that was a little different, was to wrap the middle/knotted area with embroidery floss. It makes a nice little colorful area that I can use as a feature of the scarf or It hides in the back. Either way, it is nicer than lumpy knots!

Enjoy making these, it is SOOO simple.

Shared at: Frugal Days Blog Hop 

Friday, June 22, 2012

Writing Help for young writers

Check out these CUTE Writing Offices. It helps new writers to have a reference place to access commonly used words so that they don't have to ask over and over again. These were designed by a teacher for her students but I thought Home School moms might be excited by these as well. She has them for K-beginner, K-Advanced, 1st Grade and 2nd Grade. I don't have a picture, but trust me, you will like them. :) Click the link above and it will take you directly to the Writing Offices. They fit in a pencil box!

Wednesday, May 2, 2012

New Skirt, #379

A new skirt, #379. Not really, I am just making a LOT of skirts for little girl #2 this summer. She likes them and they are SOOOO easy. I upcycled a COOL skateboard printed T-shirt. I am amazed how EASY it is to use polos and t-shirts to make skirts for little girls. FUN
This was a nice HEAVY knit T-shirt/polo cross. It had a collar but the knit was not really polo shirt-type knit. I am sure some of you know what I mean. :) So, I cut off the Tshirt under the arms. I folded over the top edge to make a casing for the elastic but this time, I folded it to the front. I stitched it down with a decorative leafy vine stitch (stitch #34 on my inexpensive computer-controlled brother sewing machine)and then stretched the edges to make it ruffled. See detail photo here.
So, Little Girl #2 likes her skirt but not the "hot" porch floor in the sunshine.
We enjoy making these skirts from discarded t's and polos. For our younger family members, they are just the thing to wear over shorts or leggings this summer. I hope you like them.