Starting NOW!
This idea is designed for Christmas but could easily be for any themed holiday. I had this project all ready to go because of a class I taught so I wanted to share while you had time to plan ahead.:) I just got out all my leftover Christmas goodies from years ago and repurposed them into a new Christmas Decor item.

Christmas Centerpiece Tutorial
You will need:
A book from Goodwill or your granny's bookcase
(I used Reader's Digest Condensed books because they are pretty, they are free at my Salvation Army Store, and I've read all the ones I have)
Hot Glue Gun and Hot Glue Sticks
6' of Ribbon (a little more if you want to make a bigger bow but 6' is enough)
Christmas pretties (non-breakable ornaments make a GREAT addition and you can get them from Christmas Tree Shops CHEAP)
Holly or evergreen from the bushes outside (or pieces of greenery garland)

You can add ANYTHING you can find that is cheap or free and when you are done it still looks awesome. I am going to do some plain nature ones next. :)
1. Wrap Ribbon around your book to measure and cut the rest off for your bow.
2. Re-wrap ribbon and hot glue ends to each other, keeping glue off book.
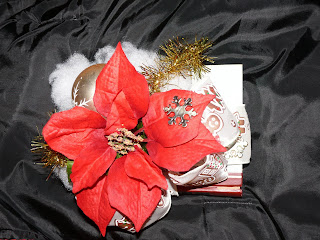
3. Wrap wire stem of large poinsettia or Christmas present cluster around the crossed center.
4. Make a Bow from other piece of ribbon, attach to center decor on one side.
5. Insert "Snow" (fiber fill) under other side of center decor.
6. Make an indention in the fiberfill to make a nest for ornament.
7. Glue fiberfill down and glue ornament in the nest.
8. Add finishing touches, like garland, tinsel, glitter spray, holly branches or evergreen sprigs, etc.
9. Carefully turn project side to side and upside down to see what needs more hot glue and add. Make sure everything is attached to everything where you can not see it.
10. Fluff up ribbon Bow and give away or place on table!
This was a fun project and with the exception of the hot glue you can do this with any age. The kids come up with some awesome creations. :)


